
Silk Naturals,

Start off by applying your eyeshadow base. The first shade I used on my lid is Twister. Its described as a gorgeous satin pearl shade of teal. It's lovely- a really nice compliment to Lunar. Its a gorgeous shimmer finish light blue.


Next we are going to take the darkest shade, Kingfisher. Kingfisher has a navy base, with aqua green highlights, and aqua glimmers. Its sort of a duo chrome finish with blues and greens, its nothing like I have ever used before. It applies really smoothly and when used wet it still gives off a really nice glitter effect.
Taking the same damp brush, apply this on the outer crease in a V shape. Blending it up into the crease. Make sure to pack on the color.
I wanted to darken up the crease a bit more. Taking a matte black on a fluffy blending brush and blend Kingfisher into Twister. I used the Sigma blending brush with Rimmel's Jet Black.

This is what you should have.


Taking Kingfisher on the same flat shader brush and apply it halfway on the lower lash line


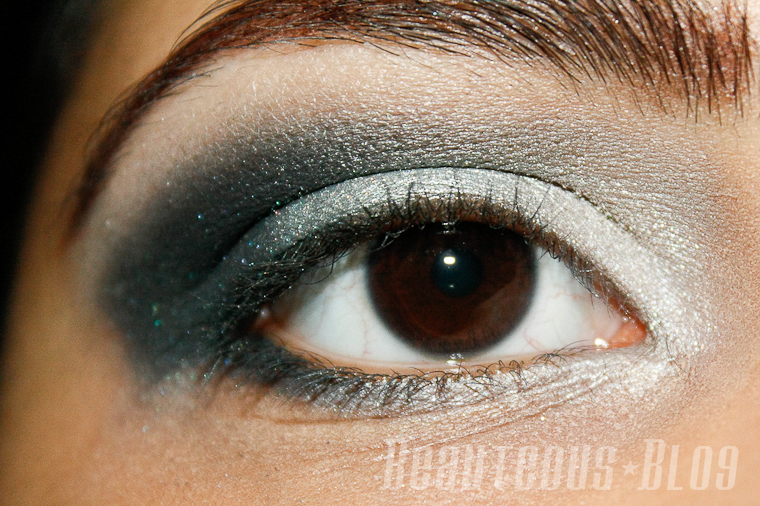
This is what you should have. I wanted the navy glitter of Kingfisher to come out a bit so I tapped on a bit of it on the outer corner with my finger.

Next taking a matte cream shade, blend out the harsh edges.

To make this.

Now taking a makeup wipe, clean up the edges creating a sharp outer edge.

Now just apply your favorite black eyeliner and mascara and you are done!

Here is what I came up with for the rest of my face. I wanted to keep the lips a bit neutral with a soft pink shade. The blush is a rosy shade and I used Vapor as a highlight on my cheekbones.

To Sum it up:
For more information check out Silk Naturals Website
So let me know what you think of the overall look and the products used from Silk Naturals!

[TUTORIAL] Majestic Makeup- Using Silk Naturals (mini-review)
Hello Everyone!
Recently I was sent some loose eyeshadows from Silk Naturals so I wanted to do a makeup tutorial and a mini review on them. Silk Naturals offer a wide variety of mineral makeup. Their loose eyeshadows promise to be crease resistant and fade proof. They are very pigmented and give the best color payoff when applied wet. I like how they mention the exact shade and finish that they used for their eyeshadows in the description. Best of all they have swatches too! Which makes it so much easier to pick a color since I always end up looking for swatches for makeup products. They offer samples of all of their products so you can try out their selection at a small price.
Here is the look I came up with! Its a very easy smokey eye, a look that I love doing since its just takes some blending to accomplish. If you want to learn how to create this look keep reading!
Start off by applying your eyeshadow base. The first shade I used on my lid is Twister. Its described as a gorgeous satin pearl shade of teal. It's lovely- a really nice compliment to Lunar. Its a gorgeous shimmer finish light blue.
 |
| Silk Naturals Eyeshadow in Twister |
I applied this with a damp flat shader brush. Note when you use eyeshadow wet to not use a soaking wet brush, it should be damp enough to make the eyeshadow in a paste.
Apply this on the center of the lid making sure to press the shadow onto the lid.
This is what you should have.
Next we are going to take the darkest shade, Kingfisher. Kingfisher has a navy base, with aqua green highlights, and aqua glimmers. Its sort of a duo chrome finish with blues and greens, its nothing like I have ever used before. It applies really smoothly and when used wet it still gives off a really nice glitter effect.
 |
| Silk Naturals Eyeshadow in Kingfisher |
I wanted to darken up the crease a bit more. Taking a matte black on a fluffy blending brush and blend Kingfisher into Twister. I used the Sigma blending brush with Rimmel's Jet Black.
This is what you should have.
Taking Kingfisher on the same flat shader brush and apply it halfway on the lower lash line
For the inner corner we are going to take Vapor. Its a creamy blue highlight Vapor looks like a shimmery cream color in the jar but when you apply it, it has the prettiest hint of blue highlights. It has a pearlescent slightly sheer finish with just a hint of sparkle. It applies really sheer so it makes the perfect highlight shade.
 |
| Silk Naturals Eyeshadow in Vapor |
Taking Vapor on a small blending brush, apply this in the inner corner and blending it down to the lashline.
This is what you should have. I wanted the navy glitter of Kingfisher to come out a bit so I tapped on a bit of it on the outer corner with my finger.
Next taking a matte cream shade, blend out the harsh edges.
To make this.
Now taking a makeup wipe, clean up the edges creating a sharp outer edge.
Now just apply your favorite black eyeliner and mascara and you are done!
Here is what I came up with for the rest of my face. I wanted to keep the lips a bit neutral with a soft pink shade. The blush is a rosy shade and I used Vapor as a highlight on my cheekbones.
Skin: Liz Earle Sheer Skin Tint in Beige (Reviewed Here)
Concealer: Silk Naturals Cream Concealer in Shade 2 (Reviewed Here)
Blush: MUA in Shade No. 4
Contour: Motives Shape and Scuplt (Reviewed Here)
Cheek Highlight: Silk Naturals Loose Eyeshadow in Vapor
These shadows are a breeze to use. I didn't find any diffculity in applying them or getting a good color pay off. The pigmentation of these are really opaque. Vapor works really well as a cheekbone highlight since its a sheer highlight color. I didn't notice the blue undertone in Vapor which was mentioned in the product description. Since I always use a eyeshadow base I didn't notice it fading or creasing of any of these. The best way to use these is either with a cream shadow base or applied wet.
For more information check out Silk Naturals Website
So let me know what you think of the overall look and the products used from Silk Naturals!

Nice Blending & really nice look...!! <3
ReplyDeletewow, you have done a great job with these shadows, very pretty Sid!!
ReplyDeleteLove it <3
ReplyDeleteThanks for the tutorial :)
look super pretty and blendable..i love the outer corner color
ReplyDeleteLovely colors and review; amazing blending. Love the look you created.
ReplyDeleteOoh, I love those colors. Looks wonderful!
ReplyDeleteaw thank you all for your lovely comments!
ReplyDeleteLoveeeelyy look <3..
ReplyDeletewhenever I want to do smokey look I always ended up with a big mess lol :( ..
Great tutorial and thanks for sharing about Silk Naturals. :) xx
ReplyDeleteHello! I have never heard of this brand before so thank you for sharing xo
ReplyDeleteGreat tutorial, I love the look. The blush looks really pretty on you. <3
ReplyDeleteVery pretty!!
ReplyDeletePlease check out my blog:)
Fashions on Top
Fashions on Top Twitter
Awesome Look! I love your tutorial as well :D
ReplyDeleteWow this looks stunning! x
ReplyDeleteThumbs up on the blending! Very informative too. :)
ReplyDeleteThis is an excellent tutorial! I haven't come across that many bloggers who show step-by-step tutorials, and the ones I did come across, this is definitely the best one!
ReplyDeleteGreat work!
I unearthed a money box loaded with circumstances. There are various destinations that furnish you with truly free online logo plans. logo design service
ReplyDelete