[REVIEW] Makeup Academy (MUA) Pro Extreme Curl Mascara


Finding the perfect mascara takes a bit of trial and error. Depending on what you want for your lashes there are mascaras that claim to give you thick voluminous lashes or long lustrous lashes. The Makeup Academy (MUA) Extreme Curl mascara in Black Brown claims to shape and curl your lashes. Here is my review on the product!


MUA Say:
Extreme Curl Mascara shapes lashes beautifully from root to tip for long-lasting curl.
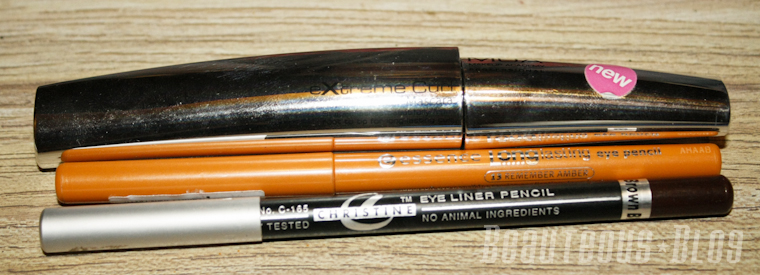

Packaging:
The packaging of the mascara comes in a cute metallic tube, the wand is long and curved. The consistency of the mascara was wet when I first used it but then after some months now its the perfect formula. Not too dry or wet. When the formula was wet I found it a bit difficult to work with since the wand is long and tapered. The wand ends up having too much product on the tip so you would need to wipe it off.
I find that with just one coat it gives amazing length and curls the lashes. I find that it gives a bit of volume but not a lot. The wand is perfect for getting the tiniest lashes. I use the wand curved down for my upper lashes and curved up to get my bottom lashes. It really helps to get the difficult inner and outer corner lashes.


Swatch:


To Sum it up:
My lashes naturally stick straight down and I find that it gives a tiny bit curl to them naturally but with curling my lashes it helps to keep the curl up. If you have lashes that don't need to be curled, this mascara is perfect for you. The mascara does start to clump if you keep wanting to build up the length. It does start to weight down my lashes if I apply too much. It gives a good amount of length and a bit of volume with just one coat. The only problem with this mascara is that it starts to feel uncomfortable to wear after 4 hours. I haven't had any issue with smudging or flaking.


Likes:
- Curved wand
- Keeps lashes curled
- Lengthens and volumizes
- Doesn't Flake


Dislikes:
- Not Waterproof
- Clumps with second coat
- Can make lashes feel hard and uncomfortable after 4 hours


Rating: 4/5
Price: £2.00


You can find this mascara available at the MUA online store here. In Pakistan you can request Just4Girls.pk to order the product for you.


Have you tried this mascara before? What did you think of it?

SIMILAR POSTS

[NAILS] Catrice- Up In The Air

Hello Everyone!

I wanted to share with you all the nail polish I picked out to wear today. Catrice's Up In The Air is creme sky blue polish. Its such a breeze to apply and dries pretty quickly. I applied 2 coats and its the perfect opacity!


You can check out Catrice on their website and their Facebook.
I've been told from a fellow blogger that Catrice is available at Scentsation at Dolmen Mall in Karachi, for more information check out their Facebook. I haven't been there to see the prices of the polishes, let me know in the comments if you do know! 

Let me know what you think of this shade! Have you tried Catrice's Nail Polishes before?

SIMILAR POSTS

[TUTORIAL] Sultry Sweetheart-- Valentine's Day Eye look

Hello everyone!

I've been seeing a lot of Valentine's day inspired makeup around the beauty blog world so I wanted to do a look that would be perfect for the occasion or any other late night event. The look I came up with has a soft pink shadow all over the lid and then using a deep plum shade in the crease. I used a rich black gel liner to accentuate the eyes along with lengthening black mascara to really make the eye's smokey and sultry!


So lets get started! First prime your eyelid with your favorite primer, you want to make sure the primer evens out your skin tone. The first shade I used is Bare Escentuals loose eyeshadow in Strawberry Daiquiri. You can use any light frosty pink shade. I applied this with a damp flat shader brush from Clarity.

Next taking a matte black shadow and a flat liner brush you want to map out where you want the crease to end. I use this method instead of applying tape since it's really uncomfortable for me. I used Noir from Sleek's Oh So Special Palette with Avon's liner brush.

Next taking Sigma's E25 blending brush and a deep plum shade start by blending out the black and then take the shadow and keep applying it. I used Celebrate from Sleek's Oh So Special Palette. You want to create a smooth gradient to the pink. Make sure to NOT apply too much product.

Now we are going to start darkening the shadow. Taking the same plum shade on a tapered brush, create a C shape with the shadow and blending it up into the crease. I used Adesign's Pointed Concealer brush.

This is what you should have now. Make sure you blend the purple and pink well. Next taking a matte cream shade blend the edges of the purple. I took Bow from Sleek's Oh So Special Palette with a sponge tip applicator to pack on the color.

Taking the same matte shade apply this in the inner tear duct making sure to blend it in with the pink.

This is what you should have now! I took some more of the purple and the black and applied it on the lower lashline making sure to connect it with crease shade. I also took a peachy shade from the same Sleek palette and applied it in the middle of the lash line.


Now clean up all of the fallout and apply your favorite black eyeliner and mascara. I used Essence Midnight in Paris gel liner on the top and lower lashline and Avon's waterproof mascara in black.

So here is our final look! 

I hope you all like my valentine's day inspired eye makeup! If you have done a look leave a link in the comment section, I would love to check it out!

<3

SIMILAR POSTS

Products and Tips to help grow your hair

Since the past year I made the commitment to grow my hair out. I've never liked having long hair before because it is a bit more difficult to manage and it takes some effort to take care of. My hair isn't extremely long but this is the longest its ever been for me and its exciting for me to see it grow. My hair grows really slow, I would say about 2 inches every 6 months. I've seen so many girls who have long hair but you can tell they don't take care of their locks. What's the point to having long hair when more than half is just nasty split ends? 


So I wanted to share some tips and products to keep your hair long and healthy if you are planning to grow it out and to avoid nasty split ends. Of course you don't have to use ALL of the mentioned products but I wanted to shed some light on some that I found to be very helpful to me. 

Products to help keep your hair long and healthy:


Extra Virgin Olive Oil
Olive oil is your best friend. Oil a necessity for keeping moisture locked in your hair. I usually apply oil at the ends and a little on my scalp at least once a week, I leave it on for about 4 hours or so. If your hair is really dry I would recommend to use it more then once a week depending on how often you wash your hair.


Tip: Use Coconut Oil in the summer since it works really well to seal in moisture. In the winters the weather is dry so it won't work well for your hair.


Herbal Essences Beautiful Ends Shampoo 
I love this shampoo! I always fear getting split ends and end up having to chop off my hair but this has helped in keeping my ends really healthy. It doesn't leave my hair that dry but for someone who has really dry hair I would recommend using their conditioner with this. I don't use conditioner since my hair gets extremely oily after a day. Ever since I stopped using conditioner my hair looks clean and less sticky even after the first day of washing it and I prefer to wash my hair every other day. If needed I use a tiny bit of the Sunsilk Smooth and Soft conditioner only at the ends. 


Dove Smooth and Soft Frizz Cream/ Leave In Replenishing Mist
Some days when I want to style my hair I use a frizz serum. These work really well and it only takes a small amount for all over the ends. I use either one of these after my hair is dry. What I love about Dove products is that they don't add so much moisture that your hair looks oily, it will help in keeping your hair detangled and soft throughout the day. I apply either one of these on the ends.


John Frieda Brilliant Brunette Shine Shock/Satin Shine
For a kick of shine I use the Shine Shock, its a serum formula so it works really well for after your straighten your hair. The Satin Shine is similar to the Dove Anti Frizz Cream, it leaves my hair soft and manageable throughout the day.

Papaya Volumizing Spray
My hair tends to be flat with long hair. One of the main reasons why I never liked growing my hair. This product really helps in giving a boost of volume on the scalp. I use this after washing my hair, after combing my hair I spritz this on my scalp and then I take a small clip and create a bump leaving it on until my hair dries. Once dried my crown area gets a ton of volume. It does harden if you spray too much.

Wide Tooth Comb
For me I need to comb my hair throughout the day if I've kept it all down. Tangles can result to damaging your hair. So comb your hair before and after you shower as well as before going to bed. If you comb your hair before you shower it'll make be easier to wash your hair and prevent any further tangles after you're done showering. 

Tip: With a wide tooth comb start combing your hair from the ends and work your way up.


So here is how long my hair is now, it might not be long for some but for me this is pretty long! Its been a huge commitment to keep it growing since I loved having short hair.

So I hope this post was helpful if you have long hair or are considering to grow it out. If you have any tips please share!


These products should be available in any major store in Pakistan.

SIMILAR POSTS

[REVIEW] Caolion Pore Minimizing Pack from WishTrend

WishTrend is an online store in Seoul, Korea that supply beauty products from various brands. Some of their beauty products include cleansers, toners, serums, masks and pore treatments. One of the brands they offer is Caolion which provide pigment-free, fragrance-free, and alcohol free skincare . They are famous for using 100% all-natural ingredients. The Pore Minimizing Pack promises to reduce pore- size while giving a calming and cooling effect. I've been testing this product out for more than 2 weeks now so lets see if it helped my pores!
What WishTrend say:
Skin Elasticity UP, Minimizing Pores OK!
It helps to make the enlarged pores elastic and soothe the skin trouble.
And it delivers moisture and enough nutrition to the skin with natural ingredients.
CAOLION Pore Minimizing Pack controls the sebum secretion, absorbs the skin wastes & makeup residues and removes dead skin cells.
Therefore it helps to make the enlarged pores elastic and soothe the skin trouble.
And it delivers moisture and enough nutrition to the skin with natural ingredients.
Properties of CAOLION Pore Minimizing Pack:
-No antiseptic, No alcohol, No pigment, No fragrance, No mineral oil
-Control of sebum secretion
-Relieving the skin trouble
-Formation of a barrier of moisture
-Decreasing the size of pores
How to Use
1. Apply evenly to dry face after foam cleansing. 
2. Rinse off after 10- 25 minutes.
※ Tip: Keeping cool in the refrigerator optimizes the effects.


For an even application I used a synthetic flat foundation brush, something cheap will work really well. I found that when I apply it with my fingers i ended up with a thick layer so it took longer to dry. Once it dries it hardens so then you can just use warm water to wash it off. 


The Pore Minimizing Pack is suitable for all skin types. It looks similar to a clay formula and it takes about 15-25 minutes to dry. It doesn't have any scent and its free from alcohol so it will not dry out your skin. While using it is gives this really refreshing tingle that feels cooling as the product promises which is from the peppermint extract. It has helped in tightening my pores as well as giving a deep cleanse removing dirt and oil. 


After the first time I used it my skin did not feel dry at all, it felt soft, supple and free from oil especially around my t-zone. I noticed that even after a day my skin still felt clean and oil-free.


My Results:
For 2 weeks I've been using this mask, I used it every other day since it wasn't drying out my skin. I apply it all over my face and wait about 20 mins then I remove it with a warm washcloth. Til now I haven't seen any major changes in the appearance of my pores around my nose but on my cheeks it has lessened. The texture of my skin has changed to being more softer and less oily. I do have the most hideous pores around my nose as you can see. 
To Sum it up:
I really like the after effects of using this product. It doesn't leave my skin dried out while also reducing the amount of oil around my t-zone. I really like how this product keeps my skin soft for more than a day, most masks end up giving you a soft texture to your skin but it will only last for a few hours and your skin ends up being oily again so I prefer using this. You receive 100g of product which is a lot since its a thick product so you don't need a lot to use it all over your face. I didn't see any major changes on the appearance of my pores.
Likes:
- No Fragrance
- Doesn't dry out your skin
- Leaves skin soft
- Reduces oil
- Applies evenly
Dislikes:
- Doesn't dramatically reduce pore size
- Pricey
- Only available online
Rating: 4/5
100g tub is priced at $30.99

For more information you can check out the product here. You can find WishTrend on Twitter, Facebook and their website.


SIMILAR POSTS

A very Luscious Giveaway! Win 4 Lip Coutures! (CLOSED)

Hello Everyone!


I am so excited for my readers today! I have another amazing giveaway for you all. Recently I reviewed the Luscious Lip Couture in En Vogue, a really pretty pink shade. I am in love with this product! I have been wanting a dupe for my Bare Escentuals Pretty Amazing Lip Color that I reviewed months ago here for the longest time and this is comparable to the high-end brand. 


So Luscious has given me 4 Lip Coutures to giveaway to one lucky fan! 


The item up for grabs! 


4 Lip Coutures in the shades:
  • Scandal- A vibrant deep red
  • Muse- Neutral light pink
  • Paparazzi- Light fuschia pink
  • Fashionista- Pink toned beige


THE RULES:
You must be a GFC follower.
If you do the optional extra entries you can NOT leave the form blank.


Required Entries:
  • Must Follow my Blog through GFC Publicly. Click Here 
Extra Entries:
  • Must Like my Facebook Fanpage. Click Here
  • Follow my Twitter. Click Here
  • Tweet the following
    •  Enter to win 4 Luscious Lip Coutures with @BeauteousBlog Open Worldwide #giveaway http://beauteousblog.blogspot.com
  • Post the Giveaway photo in your blog sidebar
  • Share the giveaway on Facebook making sure to tag my page
    • Enter to win 4 Luscious Lip Coutures with @Beauteous Blog
  • Refer a friend to this giveaway. Your friend must mention your name in the form.
  • a Rafflecopter giveaway

The giveaway starts today  25th January 2012  and ends on 25th Febuary 2012 and is open WORLDWIDE.
The winner will be selected through Random.org. The winner will be contacted by email and must respond within 48 hours with your choice of products or another winner will be chosen.


Please note that comments in this post do not qualify as entries, you must leave them in the widget so I can easily check. If Rafflecopter isn't loading for you then I will make an exception.
Good Luck Everyone! 

SIMILAR POSTS

[REVIEW] Luscious Lip Couture in En Vogue

The Luscious Lip Coutures were launched a few years back and ever since they have been a hit with many Pakistani Beauty Bloggers. The claim to fame is due to it being a pigmented liquid lip color that last for hours. For today I will be reviewing the shade En Vogue which is a perfect warm pink.
What Luscious say:
Introducing Lip Couture: vibrantly rich colour and shine in a luxurious, creamy formula. A Luscious innovation that provides the full colour coverage of a lipstick and gorgeous shine of a lip gloss. Conditions your lips in a hydrating cushion of pure indulgence in 7 stunning shades. Inspired by the world of high fashion, it's couture for your lips. 
Packaging:
The Lip Couture comes in a sleek lipgloss tube. The designs on the tube are really adorable. 
I like how the product is scented but you can't taste it, since I always end up eating some of my lipglosses that have a taste to them. It keeps my lips hydrated even after the product has faded away.

The Lip Coutures come in a variety of pink and red shades that suit all skin tones. I like how the shades are not all bold colors, all of the shades are wearable even for daytime. Although I would've liked to see some coral and berry shades in the product line. 

Swatch:

Luscious Lip Couture in En Vogue Swatch

Luscious Lip Couture in En Vogue Swatch


To Sum it up:
Overall a great long wearing product but it does transfer once you eat or drink. The consistency of the lip color is thick so the product applies really smoothly and evenly. I like how rich the pigmentation is, even with my lips the shade is vibrant. I find that I don't need to wear a lip liner under the product because it doesn't feather or bleed out. It gives a nice shine to the lips without being overly glossy. I really like how these don't have shimmer in them, you can always add a gloss on top if you like that effect. 


Likes:
- Pigmented
- Not Sticky
- Vanilla scented
- Thick consistency
- Doesn't feather
- Long wearing


Dislikes:
- Shades are limited to pinks and reds


Rating: 5/5


Price: Rs.575 Available on their website


For more information you can check out Luscious Cosmetics on Facebook.


SIMILAR POSTS

[TUTORIAL] Peaches and Cream Eye Look using ELF and Essence

Hello everyone!

I wanted to do a very natural but fun look using some peachy colors since its not practical to wear bright and bold colors for every occasion! I didn't use heavy black eyeliner but really just used a black gel liner to enhance the lashline. This look can be worn out for a daytime occasion since it is very light and only using a few colors. The entire look can be done with just the ELF Butternut Quad, so if you are looking for a great inexpensive quad I recommend checking it out!

Here is the look I came up with!

So lets get started! 
First prime your eyelid using your favorite primer, then add a thin layer of a cream color base. I used a shimmery cream from a Avon trio in Dreamy


Taking the peachy color from the ELF Butternut Quad (I depoted the shadows in case you are wondering), apply that on the inner corner. 


Taking a peachy color that's less shimmery and apply it all over the lid. I used Essence Urban Messages Eyeshadow in 03 Peace It.


Taking a cream bronzey-brown shade on a tapered pencil brush, apply that on the outer corner and taking it up into the crease. This will help bring out the powder shadows, just make sure to apply a really thin layer and blend it out. I used the same Avon trio in Dreamy.


I took a shimmery bronze color and applied it over the cream shadow, I used Essence Eyeshadow in 35 Party All Night.


Just to darken up the crease I took the darkest brown from the Elf Butternut Quad and applied it lightly over in the outer corner with the same pencil brush. Make sure to blend everything out.


Now we are going to highlight! Taking a light shimmery cream color apply that on the inner corner and directly under the arch of your eyebrow. I used Shade 1 from the MUA Heaven & Earth Palette. I also applied a copper color on the lower lashline from the same palette. Then I took an orange pencil and applied it in the waterline, I used the Essence Long Lasting Eye Pencil in 13 Remember Amber.


For lining the lashline I used the Essence Gel Liner in Midnight in Paris (Read my review here) on a really thin flat brush. This brush is great for really getting into the lashline and making a thin delicate line. Apply the liner really close to the lashes. 

For Mascara I applied MUA's Extreme Curl in Black brown. I also used a Christine's Black/brown pencil just to darken up the lower lashline.

So I hope you all liked this look! I hope this was an easy look for everyone to achieve. Let me know if you will be trying this out or if there are any other products you would like to recommend keeping with the brown and peach color scheme.

SIMILAR POSTS