[REVIEW] The Body Needs Eyeshadows

I've always had a fondness for loose eyeshadows. The pigmentation and finish of mineral shadows give superb color pay-off. For today's post I will be reviewing some loose eyeshadows from The Body Needs. What's neat about The Body Needs is that they have real MAC shadows and pigments. They constantly update their MAC products with the latest collections. Not only that but they have numerous shade selection for loose shadows, glitter pigments and lip products. Any eyeshadow shade that you are looking for, chance are they will have it.
The Shades I picked out are:
Blanc- Matte finish white
Matte Violet- Matte finish violet
Alt Gold- Frost finish light yellow gold with green reflex
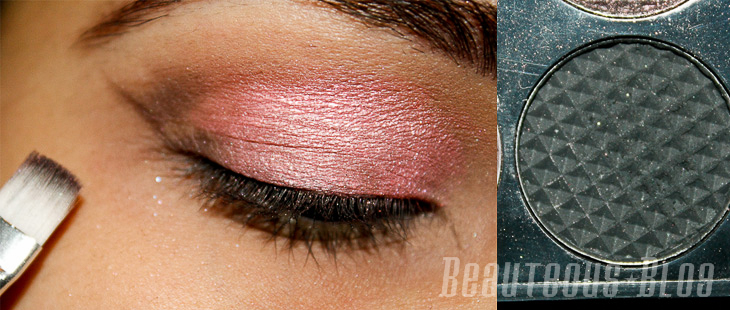
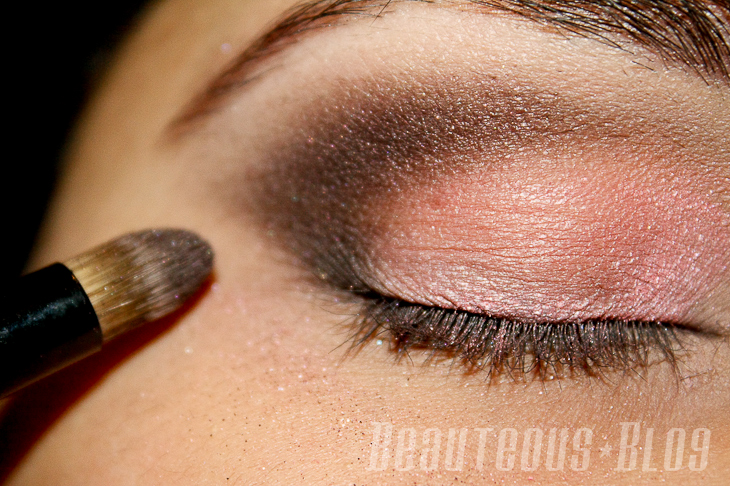
Blackened Bronze- Shimmery blackened brown


I am always looking for matte shadows to pair up with shimmer ones. With most matte shadows they come off a bit chalky, these have a very smooth texture. I am in love with Blanc, its richly pigmented matte white which I have been looking for ages!


I wanted a dupe for Makeup Forever's #92 eyeshadow, which is a the most gorgeous matte violet shade and I think I found it with Matte Violet. It comes off looking a bit lighter than MUFE's #92 in the pot but I found that if I apply this wet it turns into a slightly deeper shade.


Alt Gold is the most unique shade I have ever seen. Its sad that my camera did not pick up on the gorgeous green reflex in this shadow. I noticed I didn't need to apply this wet to get the best pigmentation, it works amazing on its own!


Blackened Bronze is a part of the Blackened Collection which has the most gorgeous shades. I love deep dark colors so the collection is perfect for thoes who like to do intense smokey eyes. This came in a Crush Pot which is a pressed version of the loose shadow. Most of the same shadows come in both versions. Crush Pots are a bit easier for some to use.


The Body Needs Swatches
Likes:
- Matte shades are easy to apply and blend
- Wide Selection of shades available
- Crush Pots are easy to work with
- Amazing color pay off
- Most shades come in pressed form


Dislikes:
None!


Rating: 5/5


Use the coupon code SP20 to receive 20% off all TBN brand cosmetics! 


For More information you can check out The Body Needs on their Website and their Facebook Page Here


What did you think of the shadows I picked? Have you tried The Body Needs before?

SIMILAR POSTS

[REVIEW] Luscious Cosmetics Whitening Base SPF 35 -- New and Improved!

A product that promises to be an all-in-one solution is something I always look forward to trying. With the New and Improved Luscious Cosmetics Whitening Base for Oily Skin, it promises to be a high performance sunscreen, makeup primer, and an oil-free moisturizer all in one. By providing a smooth and even texture to your skin, this product helps to protect your skin from the sun while prepping it for makeup all while giving a bright appearance to your skin.
Luscious Says:

Save Your Skin!
Sun damage has become a big part of our lives due to pollution and the environment. No matter what your age is, you are at risk of sun damage (dark patches and uneven skin tone) every time you step out without a good sun block.

Here to the rescue is Luscious Whitening Base SPF 35.
All in One:
• Oil-free Moisturiser
• High performance Sun Protection
• Makeup Primer

The benefits: The list is endless. With continued use, you will see a visibly clearer and fairer complexion, as well as smoother skin texture.

So whats new and improved?
  • More product- 45ml compared to 30ml
  • Improved Packaging
  • A hydrating formula with the Normal/Dry version 
Packaging:
The prominent change of the new version is the packaging. Previously the Whitening Base came in a short tube, now the product comes in a thinner squeezeable tube with a tiny opening. It dispenses the perfect amount of product since you need the smallest bit to cover your entire face.

The product is a white creamy consistency, same as the previous version, which gives a sheer tint to your skin.  You only need a small amount of product to apply all over your skin. If you find that this leaves your skin looking too ghostly than you applied too much which was one of my first mistakes.
Luscious Cosmetics Whitening Base for Oily Skin
I blended out the product on the right side of my hand. 
Luscious Cosmetics Whitening Base for Oily Skin  Swatch
To Sum it up:
This worked pretty ok for me since its the winter season, I am not sure how this would perform under humidity and heat. It evened out my skin-tone and gave a bit of moisture. I find that this product has replaced my moisturizer before I start my makeup, since I have an oily T-zone even the lightest formula moisturizer makes my skin feel greasy. I wish that it mattified my skin, after a few hours of using this my t-zone did get oily which I would expect a primer to help control the oil and keep my foundation on all day. It does however leave my skin feeling softer, the added SPF 35 is a great benefit with the formula. This also works really well to slightly minimize my pores. 

I love how this product feels on my face, it doesn't leave any sort of cakey appearance but it really brightens up the skin. I normally use this with my Bare Minerals Foundation in Medium Beige for daytime coverage and after 2-3 few hours my t-zone starting getting oily. I have tried this for an evening look just to see how it would work as a primer, I didn't notice a huge difference compared to not using it. I find this to be perfect for an everyday SPF with a hint of coverage but if you have really oily skin then don't expect this to keep your skin oil-free throughout the day. If you have dry skin and the previous version left your skin looking flaky then the Normal/Dry Whitening Base will help to hydrate your skin.

Likes:
- Smooth application
- Good amount of SPF
- Helps apply foundation evenly
- Not greasy
- Only need a tiny amount for full face 
- Brightens up skin

Dislikes:
- Not long wearing

Rating: 4/5

Price: Rs.975 Available on their website

For more information you can check out Luscious Cosmetics on Facebook.

SIMILAR POSTS

[TUTORIAL] Gunmetal Smokes-- Inspired by Emma Stone at 2012 Golden Globes

Hello Everyone!

About a week or so ago Hareem from iheartmexo requested for me to do a tutorial on the eye makeup that Emma Stone wore at this years Golden Globe Awards. I absolutely adore Emma, she is such a witty and versatile actress so I was thrilled to be requested this soft smokey look. Emma wore a very pretty grey smokey eye with a bit of black on the inner and outer corner. This technique really helps to bring out the eyes more since the lightest shade is in the middle of the lid. She is an ambassador of Revlon so most of the products she used were from the brand. 

This is my second attempt to create this look, the first time I shot this look I wasn't happy with how it turned out. Although I am no professional makeup artist I wanted it to be really similar to her look so I hope you all like what I created. I  recreated the look using some shimmery grey and gunmetal shades. Here is what I came up with:
Here is Emma's look:
Image taken from Google.com
The Products she used:
Face:
Eyes:
Lips:

So lets get started shall we?

First start off with your favorite eyeshadow primer to even out your eyelid. I used Essence You Rock Eyeshadow Base. Now taking a creamy black eyeliner, something that is easily smudgeable. Start by creating a V-shape on the outer corner of your eye, this will help map out the cat eye shape.

Next we are going to take a small smudger brush and blend out the eyeliner. Make sure you don't over blend, just make sure the black eyeliner is smoothed out.


This is what you should have, make sure the outer V still has its shape. You can always clean up the edges to make it more sharp.


Next we are going to take a slate grey shade and apply it all of the lid leaving the inner and outer corner bare. The shade I used is from a Mabrook palette with a flat shader brush to really pack on the color.

Next we are going to take a gunmetal shade, this should be at least 1 or 2 shades darker then the grey on the lid. You can use the same brush for this, and apply it in the inner corner blending it up into the slate grey.

Taking an angled brush, I wanted to use the same slate grey shade, and blend out the gunmetal shade into the inner corner.

Taking a shimmery black on the same smudge brush that we used for the base, apply this on the outer corner on top of the black eyeliner. I didn't want to use a matte black because then it would be a bit too black so we want to keep the grey tones to be prominent. I used a CoverGirl eyeshadow in Shimmering Onyx. I didn't use a blending brush because I wanted to have a bit more control with the color, using a blending brush can move the color all over the lid and we don't want that. What makes Emma's look really pretty is the cat eye shape of the outer corner, it comes out in a V-shape. Also make sure to blend the slate grey and black smoothly. 

Taking the same black, use what is leftover on the brush and apply a little bit of it on the inner corner. Apply this on top of the gun metal shade.

This is what you should have by now, you can take a makeup wipe and clean up the fall out and then apply concealer. 


Time for blending! Take a matte cream color on a blending brush and apply this where your eyeshadow ends. Sweep the shadow all over the brow bone to blend out the harsh edges. I used a matte cream from the Catrice Duo in  070 Double Expresso Macchaito, Please! with Elf Studio Contour brush.


Also, apply the same slate grey eyeshadow on the lower lashline using a damp angled liner brush to really pack on the color. Take the same brush and apply a bit of black on the outer lashline  to connect the slate grey and black.


Next apply your favorite eyeliner, I used Avon's Glimmerstick in Blackest Black (read my review here) Make sure to not line your eyes very thick, Emma's eyeliner is really clean on the waterline as well as the top lashline. I also applied this on my tightline. For my mascara I used Avon Wash-Off Waterproof mascara in Black.
This is how your eyes should look now! The eyeliner isn't so noticeable but its there, which is exactly what we want!


Our final look!


I really love how this look turned out! I hope you all like it as much as I do. It's really similar to Emma Stone's look so I hope you all try this out and let me know!

SIMILAR POSTS

[REVIEW] Makeup Academy (MUA) Pro Extreme Curl Mascara


Finding the perfect mascara takes a bit of trial and error. Depending on what you want for your lashes there are mascaras that claim to give you thick voluminous lashes or long lustrous lashes. The Makeup Academy (MUA) Extreme Curl mascara in Black Brown claims to shape and curl your lashes. Here is my review on the product!


MUA Say:
Extreme Curl Mascara shapes lashes beautifully from root to tip for long-lasting curl.


Packaging:
The packaging of the mascara comes in a cute metallic tube, the wand is long and curved. The consistency of the mascara was wet when I first used it but then after some months now its the perfect formula. Not too dry or wet. When the formula was wet I found it a bit difficult to work with since the wand is long and tapered. The wand ends up having too much product on the tip so you would need to wipe it off.
I find that with just one coat it gives amazing length and curls the lashes. I find that it gives a bit of volume but not a lot. The wand is perfect for getting the tiniest lashes. I use the wand curved down for my upper lashes and curved up to get my bottom lashes. It really helps to get the difficult inner and outer corner lashes.


Swatch:


To Sum it up:
My lashes naturally stick straight down and I find that it gives a tiny bit curl to them naturally but with curling my lashes it helps to keep the curl up. If you have lashes that don't need to be curled, this mascara is perfect for you. The mascara does start to clump if you keep wanting to build up the length. It does start to weight down my lashes if I apply too much. It gives a good amount of length and a bit of volume with just one coat. The only problem with this mascara is that it starts to feel uncomfortable to wear after 4 hours. I haven't had any issue with smudging or flaking.


Likes:
- Curved wand
- Keeps lashes curled
- Lengthens and volumizes
- Doesn't Flake


Dislikes:
- Not Waterproof
- Clumps with second coat
- Can make lashes feel hard and uncomfortable after 4 hours


Rating: 4/5
Price: £2.00


You can find this mascara available at the MUA online store here. In Pakistan you can request Just4Girls.pk to order the product for you.


Have you tried this mascara before? What did you think of it?

SIMILAR POSTS

[NAILS] Catrice- Up In The Air

Hello Everyone!

I wanted to share with you all the nail polish I picked out to wear today. Catrice's Up In The Air is creme sky blue polish. Its such a breeze to apply and dries pretty quickly. I applied 2 coats and its the perfect opacity!


You can check out Catrice on their website and their Facebook.
I've been told from a fellow blogger that Catrice is available at Scentsation at Dolmen Mall in Karachi, for more information check out their Facebook. I haven't been there to see the prices of the polishes, let me know in the comments if you do know! 

Let me know what you think of this shade! Have you tried Catrice's Nail Polishes before?

SIMILAR POSTS

[TUTORIAL] Sultry Sweetheart-- Valentine's Day Eye look

Hello everyone!

I've been seeing a lot of Valentine's day inspired makeup around the beauty blog world so I wanted to do a look that would be perfect for the occasion or any other late night event. The look I came up with has a soft pink shadow all over the lid and then using a deep plum shade in the crease. I used a rich black gel liner to accentuate the eyes along with lengthening black mascara to really make the eye's smokey and sultry!


So lets get started! First prime your eyelid with your favorite primer, you want to make sure the primer evens out your skin tone. The first shade I used is Bare Escentuals loose eyeshadow in Strawberry Daiquiri. You can use any light frosty pink shade. I applied this with a damp flat shader brush from Clarity.

Next taking a matte black shadow and a flat liner brush you want to map out where you want the crease to end. I use this method instead of applying tape since it's really uncomfortable for me. I used Noir from Sleek's Oh So Special Palette with Avon's liner brush.

Next taking Sigma's E25 blending brush and a deep plum shade start by blending out the black and then take the shadow and keep applying it. I used Celebrate from Sleek's Oh So Special Palette. You want to create a smooth gradient to the pink. Make sure to NOT apply too much product.

Now we are going to start darkening the shadow. Taking the same plum shade on a tapered brush, create a C shape with the shadow and blending it up into the crease. I used Adesign's Pointed Concealer brush.

This is what you should have now. Make sure you blend the purple and pink well. Next taking a matte cream shade blend the edges of the purple. I took Bow from Sleek's Oh So Special Palette with a sponge tip applicator to pack on the color.

Taking the same matte shade apply this in the inner tear duct making sure to blend it in with the pink.

This is what you should have now! I took some more of the purple and the black and applied it on the lower lashline making sure to connect it with crease shade. I also took a peachy shade from the same Sleek palette and applied it in the middle of the lash line.


Now clean up all of the fallout and apply your favorite black eyeliner and mascara. I used Essence Midnight in Paris gel liner on the top and lower lashline and Avon's waterproof mascara in black.

So here is our final look! 

I hope you all like my valentine's day inspired eye makeup! If you have done a look leave a link in the comment section, I would love to check it out!

<3

SIMILAR POSTS

Products and Tips to help grow your hair

Since the past year I made the commitment to grow my hair out. I've never liked having long hair before because it is a bit more difficult to manage and it takes some effort to take care of. My hair isn't extremely long but this is the longest its ever been for me and its exciting for me to see it grow. My hair grows really slow, I would say about 2 inches every 6 months. I've seen so many girls who have long hair but you can tell they don't take care of their locks. What's the point to having long hair when more than half is just nasty split ends? 


So I wanted to share some tips and products to keep your hair long and healthy if you are planning to grow it out and to avoid nasty split ends. Of course you don't have to use ALL of the mentioned products but I wanted to shed some light on some that I found to be very helpful to me. 

Products to help keep your hair long and healthy:


Extra Virgin Olive Oil
Olive oil is your best friend. Oil a necessity for keeping moisture locked in your hair. I usually apply oil at the ends and a little on my scalp at least once a week, I leave it on for about 4 hours or so. If your hair is really dry I would recommend to use it more then once a week depending on how often you wash your hair.


Tip: Use Coconut Oil in the summer since it works really well to seal in moisture. In the winters the weather is dry so it won't work well for your hair.


Herbal Essences Beautiful Ends Shampoo 
I love this shampoo! I always fear getting split ends and end up having to chop off my hair but this has helped in keeping my ends really healthy. It doesn't leave my hair that dry but for someone who has really dry hair I would recommend using their conditioner with this. I don't use conditioner since my hair gets extremely oily after a day. Ever since I stopped using conditioner my hair looks clean and less sticky even after the first day of washing it and I prefer to wash my hair every other day. If needed I use a tiny bit of the Sunsilk Smooth and Soft conditioner only at the ends. 


Dove Smooth and Soft Frizz Cream/ Leave In Replenishing Mist
Some days when I want to style my hair I use a frizz serum. These work really well and it only takes a small amount for all over the ends. I use either one of these after my hair is dry. What I love about Dove products is that they don't add so much moisture that your hair looks oily, it will help in keeping your hair detangled and soft throughout the day. I apply either one of these on the ends.


John Frieda Brilliant Brunette Shine Shock/Satin Shine
For a kick of shine I use the Shine Shock, its a serum formula so it works really well for after your straighten your hair. The Satin Shine is similar to the Dove Anti Frizz Cream, it leaves my hair soft and manageable throughout the day.

Papaya Volumizing Spray
My hair tends to be flat with long hair. One of the main reasons why I never liked growing my hair. This product really helps in giving a boost of volume on the scalp. I use this after washing my hair, after combing my hair I spritz this on my scalp and then I take a small clip and create a bump leaving it on until my hair dries. Once dried my crown area gets a ton of volume. It does harden if you spray too much.

Wide Tooth Comb
For me I need to comb my hair throughout the day if I've kept it all down. Tangles can result to damaging your hair. So comb your hair before and after you shower as well as before going to bed. If you comb your hair before you shower it'll make be easier to wash your hair and prevent any further tangles after you're done showering. 

Tip: With a wide tooth comb start combing your hair from the ends and work your way up.


So here is how long my hair is now, it might not be long for some but for me this is pretty long! Its been a huge commitment to keep it growing since I loved having short hair.

So I hope this post was helpful if you have long hair or are considering to grow it out. If you have any tips please share!


These products should be available in any major store in Pakistan.

SIMILAR POSTS